
How to Use Delay Start on Instant Pot: A Simple Guide for Home Cooks

You want dinner ready later, but you do not want to stand in the kitchen waiting to press Start. That is exactly why many Instant Pot models include a Delay Start feature. Learning how to use delay start on Instant Pot can make rice, oatmeal, beans, and some simple meals much easier to schedule.
But there is one important catch: Delay Start is not safe for every food. It works best for shelf-stable or low-risk ingredients, not raw meat, seafood, dairy, or anything that should stay cold before cooking.
In this guide, you will learn what Delay Start does, how to set it, when to use it, when to avoid it, and what to do if the button does not work on your model.
Quick Answer
To use Delay Start on Instant Pot, add ingredients, close the lid, choose your cooking program, set the cook time, press Delay Start, then set how long you want the Instant Pot to wait before cooking begins. Use it only for safe foods like rice, beans, oats, and water-based recipes.
What Does Delay Start Mean on an Instant Pot?
Delay Start is a timer that tells your Instant Pot to wait before it begins cooking.
For example, if you set Delay Start for 3 hours, the Instant Pot does not start pressure cooking immediately. It counts down for 3 hours first. When the countdown ends, the selected cooking program begins.
This is different from cook time.
- Cook time means how long the food cooks under pressure.
- Delay Start time means how long the machine waits before cooking starts.
So, if you set a 4-hour delay and a 10-minute pressure cook time, your Instant Pot waits 4 hours first. Then it starts heating, builds pressure, cooks for 10 minutes, and releases pressure depending on your recipe.
Many Instant Pot manuals explain model-specific controls, so it is smart to check your own model on the official Instant Pot product manuals page if your button names look different.
When Should You Use Delay Start?
Delay Start is useful when you want food to start cooking later without needing to press the button at that exact time.
It can be helpful for:
- Morning oatmeal
- Plain rice
- Brown rice
- Dried beans
- Lentils
- Steel-cut oats
- Water-based soups with shelf-stable ingredients
- Some grain bowls
- Certain vegetable-only recipes
A common example is setting up steel-cut oats before bed. You add oats, water, and a pinch of salt, set Delay Start, and the Instant Pot begins cooking before breakfast.
Another practical example is rice. You can rinse rice, add water, set a short delay, and have it ready closer to dinner.
The best Delay Start recipes are simple, water-based, and made with ingredients that can safely sit at room temperature for the delay period.
When You Should Not Use Delay Start
Delay Start is convenient, but it is not a food-storage feature. The Instant Pot does not keep raw food cold while it waits.
Avoid Delay Start with:
- Raw chicken
- Raw beef
- Raw pork
- Raw seafood
- Eggs
- Milk
- Cream
- Yogurt
- Cheese
- Cooked leftovers
- Frozen meat that may thaw before cooking
- Any food that normally needs refrigeration
FoodSafety.gov explains that bacteria grow fastest between 40°F and 140°F, often called the temperature danger zone, and perishable foods should not sit out too long before cooking or chilling. Their food safety steps for chilling and cooking are a good reference for home kitchens.
Simple rule: If the ingredient belongs in the refrigerator, do not leave it sitting in the Instant Pot for hours before cooking.
How to Use Delay Start on Instant Pot Step by Step
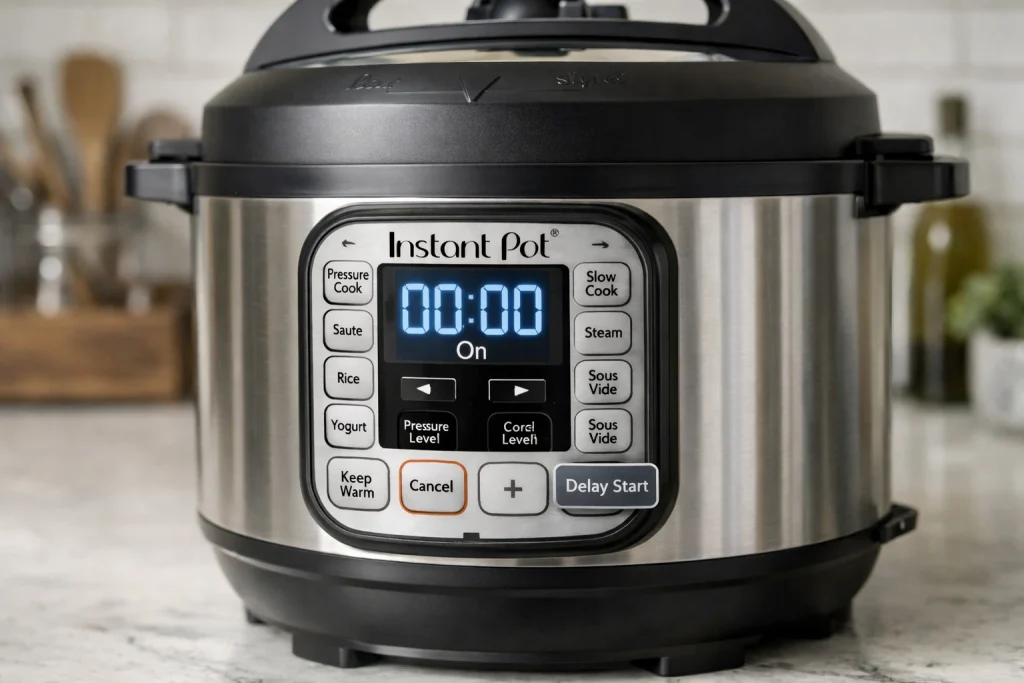
Most Instant Pot models follow a similar process, but the exact button names may vary. Some older models call it Timer instead of Delay Start. Some newer models use a dial or touchscreen.
Here is the basic method.
Step 1: Add Your Ingredients
Place your ingredients into the inner pot.
For pressure cooking, you usually need liquid. Many recipes use water, broth, or another thin cooking liquid. Thick sauces can sometimes trigger a burn warning, so follow the recipe closely.
For rice, oats, beans, and grains, measure carefully. These foods expand as they cook.
Do not fill the pot too high. For foods that foam or expand, such as beans, rice, and oats, stay well below the max fill line.
Step 2: Check the Sealing Ring and Lid
Before closing the lid, check that the silicone sealing ring is properly seated inside the lid.
Then close the lid and turn it until it locks into place.
Make sure the steam release valve is in the correct sealing position if your model requires manual sealing. Some newer models seal automatically.
Step 3: Choose the Cooking Program
Select the program you want to use.
Common choices include:
- Pressure Cook
- Manual
- Rice
- Multigrain
- Porridge
- Bean/Chili
- Soup/Broth
On many models, Manual and Pressure Cook mean almost the same thing. Older Instant Pots often say Manual. Newer models usually say Pressure Cook.
Step 4: Set the Cook Time
Now set the actual cooking time.
This is the time the food will cook once the Instant Pot finishes waiting and comes to pressure.
For example:
- White rice may need only a few minutes.
- Brown rice usually needs longer.
- Dried beans may need 25–40 minutes depending on the bean.
- Steel-cut oats may need around 3–5 minutes under pressure, depending on your recipe.
Remember, the Instant Pot also needs time to heat up and build pressure. That preheating time is not the same as the programmed cook time.
Step 5: Press Delay Start
Press the Delay Start button.
If your model says Timer, use that button instead. On some models, Timer means delayed start, not cooking time.
This is a common point of confusion. Many home cooks press Timer thinking it sets the pressure cook time. If your food never starts when expected, this may be why.
Step 6: Set the Delay Time
Use the plus/minus buttons, dial, or touchscreen to set how long you want the Instant Pot to wait before cooking starts.
For example:
- Set 1:00 if you want cooking to begin in 1 hour.
- Set 3:30 if you want cooking to begin in 3 hours and 30 minutes.
- Set 8:00 only for foods that are safe to sit that long.
Many Duo-style models allow Delay Start from about 10 minutes up to 24 hours, but this can vary by model. Always check your own manual if you are unsure.
Step 7: Let the Countdown Begin
After a few seconds, the Instant Pot should begin counting down.
Once the delay countdown ends, the cooking program starts. The display may show On while the Instant Pot heats up and builds pressure.
Then the actual cook timer begins.
Step 8: Release Pressure Safely
When cooking finishes, follow the recipe’s pressure release instructions.
There are two main methods:
- Natural Release: Let the pressure come down on its own.
- Quick Release: Turn or press the steam release control to release steam faster.
Use caution. Steam is very hot. Keep your face, hands, cabinets, and children away from the steam release area.
Delay Start Time vs. Cooking Time: Do Not Mix Them Up
This is the biggest mistake beginners make.
Delay Start does not mean “cook for this long.” It means “wait this long before cooking.”
Here is a simple example:
| Setting | What It Means | Example |
|---|---|---|
| Cook Time | How long the food cooks under pressure | 10 minutes |
| Delay Start | How long the Instant Pot waits before cooking | 3 hours |
| Preheat Time | Time needed to build pressure | 10–20 minutes, depending on food |
| Natural Release | Time pressure drops after cooking | 10–40 minutes, depending on recipe |
So if you want rice ready at 6:00 p.m., do not set the delay for exactly the number of hours until 6:00. You also need to account for preheating, cooking, and pressure release.
A better plan is to give yourself extra time. Rice can sit on Keep Warm for a short period after cooking, but delicate foods may become softer if they sit too long.
Best Foods to Cook with Instant Pot Delay Start
Delay Start works best for foods that do not spoil quickly at room temperature.
Rice
Rice is one of the most practical uses for Delay Start.
You can add rinsed rice and water, set the Rice or Pressure Cook program, and delay the start so the rice finishes closer to mealtime.
Best options include:
- White rice
- Jasmine rice
- Basmati rice
- Brown rice
- Wild rice blends
Avoid adding meat, dairy, or cream-based sauces before a long delay.
Steel-Cut Oats
Steel-cut oats are another good choice.
Add oats, water, and salt before bed. Set Delay Start so cooking begins before you wake up. In the morning, stir in milk, fruit, nuts, maple syrup, or cinnamon after cooking.
This keeps the delayed ingredients simple and safer.
Dried Beans
Dried beans can work well with Delay Start, especially if you want them ready later in the day.
Good choices include:
- Black beans
- Pinto beans
- Chickpeas
- Navy beans
- Kidney beans
For kidney beans, make sure you follow proper cooking guidance. They need thorough cooking to be safe and pleasant to eat.
Lentils and Grains
Lentils, barley, farro, quinoa, and similar grains can also work, depending on the recipe.
Use water or broth, avoid dairy during the delay, and season after cooking if you are unsure how ingredients will hold up.
Foods You Should Never Delay Start
Some foods should not sit in a room-temperature Instant Pot while waiting to cook.
Avoid using Delay Start for:
- Chicken and rice with raw chicken
- Beef stew with raw beef
- Chili with raw ground meat
- Seafood soup
- Mac and cheese
- Creamy pasta
- Egg casseroles
- Yogurt
- Leftover soup
- Frozen meat dishes
Even if the food will be pressure cooked later, bacteria can multiply before cooking begins. Pressure cooking may kill many bacteria, but it may not fix toxins or quality problems that developed while food sat out.
When in doubt, skip Delay Start and cook right away.
Can You Use Delay Start with Sauté or Yogurt?
Usually, no.
On many Instant Pot models, Delay Start is not available with Sauté or Yogurt.
That makes sense. Sauté is meant for active cooking with the lid off. Yogurt needs controlled fermentation and should follow the model’s yogurt instructions carefully.
If Delay Start does not activate with a certain program, your Instant Pot may be preventing that combination by design.
Expert Tip
Expert Tip:
For safer Delay Start cooking, use it mostly for dry grains, dried beans, oats, and water-based recipes. Add dairy, cooked meat, fresh herbs, cheese, cream, or seafood after cooking whenever possible.
Safety Tips Before Using Delay Start
Delay Start combines electricity, heat, pressure, and food safety. It is simple to use, but it deserves care.
Keep the Instant Pot on a Safe Surface
Place the cooker on a flat, stable, heat-resistant counter.
Do not put it:
- Near the edge of the counter
- Under low cabinets during steam release
- Beside the sink
- On a stovetop
- On a towel
- Near curtains or paper towels
The CPSC warns that damaged cords and overloaded extension cords can create shock or fire risks, so follow basic electrical safety guidance for appliances and cords.
Do Not Use a Damaged Cord
Before using Delay Start, check the cord and plug.
Do not use the Instant Pot if you see:
- Frayed wiring
- Burn marks
- Loose plug connection
- Cracked housing
- Melted plastic smell
- Sparks
- Repeated power loss
Electrical Safety Foundation International also recommends checking appliance cords and keeping electrical products away from water, which is especially important in kitchens with crowded counters and wet sinks. Their appliance safety tips are useful for everyday home use.
Do Not Leave Risky Food Waiting
This is the most important safety point.
Delay Start does not refrigerate your food. If the recipe includes raw meat, seafood, eggs, milk, cream, cheese, or cooked leftovers, do not let it sit for hours before cooking.
Use the refrigerator, not the Instant Pot, for holding perishable ingredients.
How to Plan Delay Start So Food Is Ready on Time
Delay Start takes a little planning because total time includes more than the delay.
Think of it like this:
Total time = delay time + preheat time + cook time + pressure release time
Let’s say you want brown rice ready around 6:30 p.m.
Your recipe may need:
- 20 minutes to build pressure
- 22 minutes cook time
- 10 minutes natural release
That is about 52 minutes after cooking begins.
If it is 3:00 p.m. now and you want the rice ready at 6:30 p.m., you do not set a 3.5-hour delay. That would make cooking begin at 6:30, not finish at 6:30.
Instead, set the delay for about 2.5 hours, so cooking begins around 5:30 p.m.
This gives the Instant Pot time to heat, cook, and release pressure.
Delay Start Pros and Cons
| Pros | Cons |
|---|---|
| Helps schedule meals around work, errands, or school | Not safe for raw meat, dairy, seafood, or leftovers |
| Great for rice, oats, beans, and grains | Can be confusing if you mix up delay time and cook time |
| Reduces the need to press Start later | Food may over-soften if Keep Warm runs too long |
| Useful for meal prep | Not available on every cooking program |
| Saves attention during busy evenings | Model controls vary |
Delay Start is a convenience feature, not a magic fix for every recipe. Use it where it makes sense, and it can become one of the most helpful buttons on your Instant Pot.
Why Is Delay Start Not Working?
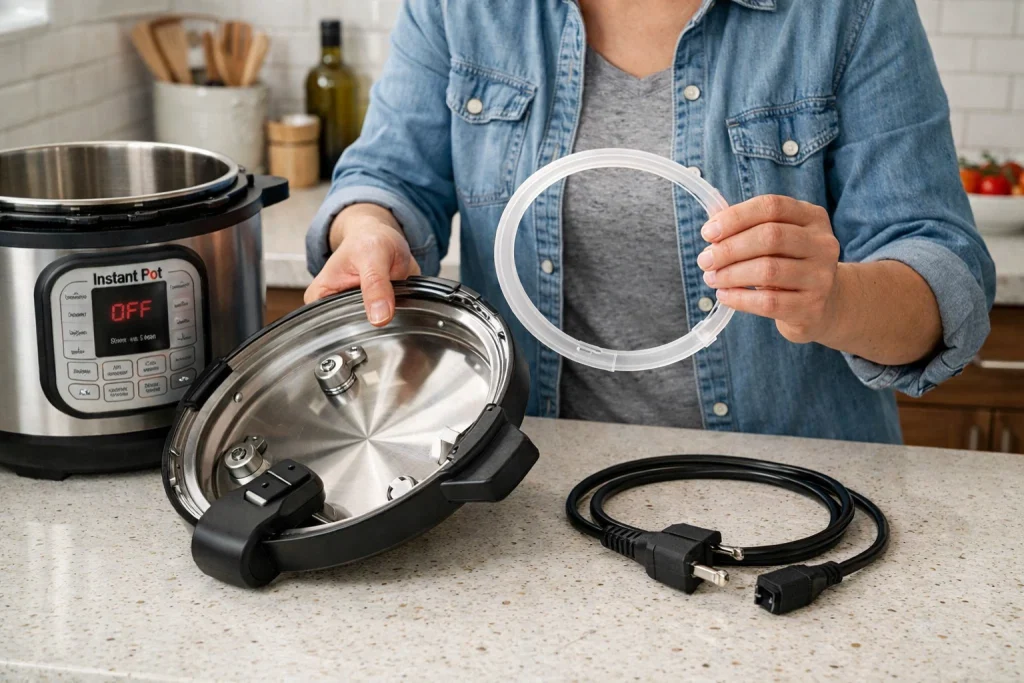
If Delay Start is not working, do not panic. It is usually a setup issue or a model limitation.
The Program Does Not Support Delay Start
Try using Pressure Cook or Rice instead of Sauté or Yogurt.
Many models block Delay Start on programs where delayed cooking is not suitable.
You Pressed the Wrong Button
On older models, Timer may mean Delay Start.
On newer models, Timer may refer to something else, or the feature may be inside a menu.
Check your model manual if the display is not behaving as expected.
You Forgot to Set the Cook Program First
Usually, you choose the cooking program and cook time first. Then you press Delay Start.
If you press Delay Start before selecting the cooking mode, the cooker may not know what program to delay.
The Lid Is Not Closed Correctly
For pressure cooking, the lid must be locked properly.
Check:
- Lid alignment
- Sealing ring placement
- Steam release position
- Inner pot position
The Cord Is Loose
Some Instant Pot cords detach from the back of the cooker. Push the cord firmly into the base and the wall outlet.
If the display flickers or turns off, stop using the appliance until you know the cord and outlet are safe.
Common Mistakes Home Cooks Should Avoid
- Using Delay Start with raw meat. This is the biggest safety mistake.
- Thinking Delay Start is cook time. It is the waiting time before cooking begins.
- Forgetting preheat time. Pressure cooking does not begin the second the program starts.
- Filling the pot too high. Rice, oats, and beans expand while cooking.
- Using thick sauces without enough thin liquid. This can lead to burn warnings.
- Leaving cooked food on Keep Warm too long. Texture can suffer, especially with rice and oats.
- Using Delay Start without checking the sealing ring. A loose ring can stop the pot from reaching pressure.
- Setting it overnight for unsafe foods. Use overnight delay only for low-risk recipes like oats or grains.
- Ignoring model differences. Duo, Lux, Pro, Rio, and Duo Crisp controls are not always identical.
Cost, Quality, and Product-Choice Considerations
If Delay Start is important to you, check for it before buying an Instant Pot or any electric pressure cooker.
Budget models may have fewer controls. Mid-range models often include Delay Start, Keep Warm, Rice, Pressure Cook, and other common programs. Premium models may offer easier displays, dial controls, app features, or more precise settings.
When comparing models, look for:
- Clear Delay Start button or menu
- Easy-to-read display
- Simple pressure release design
- Stainless steel inner pot
- Replacement sealing rings available
- Good customer support
- Manual available online
- Safety features listed by the manufacturer
For most home cooks, a simple 6-quart Instant Pot with Pressure Cook, Rice, Sauté, Keep Warm, and Delay Start is enough.
A larger 8-quart model may be better for families, batch cooking, or meal prep. A 3-quart model works well for singles, couples, dorms, and small kitchens, but it may feel limited for soups or large batches.
When to Contact Customer Support or Replace the Appliance
Contact Instant Pot customer support or consider replacing the appliance if you notice repeated issues that basic troubleshooting does not fix.
Contact Support If:
- Delay Start never activates on supported programs
- The display shows error codes often
- The cooker shuts off during countdown
- The lid does not lock correctly
- The float valve does not rise during pressure cooking
- The appliance has a burning plastic smell
- The control panel buttons do not respond
- Steam leaks heavily from the lid even with the sealing ring installed
Replace the Appliance If:
- The power cord is damaged
- The base has been dropped or cracked
- Water entered the cooker base
- The heating element no longer works reliably
- Replacement parts are unavailable
- Repair cost is close to the cost of a new unit
- The appliance is old and showing multiple safety issues
Do not open the cooker base or attempt electrical repairs yourself. The base contains electrical parts and heating components. DIY repair can create shock, fire, or pressure-related risks.
Simple parts like sealing rings, steam release valves, float valves, and inner pots can often be replaced. But electrical problems, cracked housings, and repeated control-panel failures should be handled by the manufacturer or solved with replacement.
FAQs
Can I use Delay Start for chicken in the Instant Pot?
No. Do not use Delay Start with raw chicken. Chicken should not sit at room temperature for hours before cooking. Cook it right away or keep it refrigerated until you are ready.
Can I use Delay Start for rice?
Yes, rice is one of the best uses for Delay Start. Add rice and water, choose the right program, set the cook time if needed, then set the delay. Avoid adding meat or dairy before the delay.
Why does my Instant Pot say “On” after Delay Start ends?
“On” usually means the Instant Pot has started heating and is building pressure. Once pressure is reached, the cook timer begins counting down.
Is Delay Start the same as Keep Warm?
No. Delay Start waits before cooking begins. Keep Warm turns on after cooking finishes to hold food warm. They happen at opposite ends of the cooking process.
Can I use Delay Start overnight?
Yes, but only with safer foods like oats, rice, dried beans, or grains. Do not use overnight Delay Start with meat, seafood, dairy, eggs, or leftovers.
Why can’t I use Delay Start with Sauté?
Sauté is designed for active cooking with the lid off. It is not meant to start later while unattended, so many Instant Pot models do not allow Delay Start with Sauté.
How long can I delay cooking in an Instant Pot?
Many models allow a delay from around 10 minutes up to 24 hours, but this varies. Check your model manual. More importantly, choose a delay time that is safe for the ingredients you are using.
Conclusion
Learning how to use delay start on Instant Pot is simple once you understand the difference between delay time and cook time. Choose your program, set the cooking time, press Delay Start, set the waiting time, and let the cooker begin later.
The feature is best for rice, oats, beans, lentils, and grains. It is not safe for raw meat, seafood, dairy, eggs, or leftovers that need refrigeration.
Use Delay Start as a smart scheduling tool, not a food-storage shortcut. Start with a simple rice or oatmeal recipe, check your model’s manual, and build confidence from there. That is the easiest way to make your Instant Pot more useful, safer, and better suited to your everyday kitchen routine.