How to Organize a Small Kitchen Easily — Smart Layouts, Storage Hacks, and Quick Steps
You can make a small kitchen work hard for you by using a few smart habits and simple tools. Clear zones, fewer items, and vertical storage free up space and make cooking faster and less stressful. Start by deciding what you use daily and give each item a logical home.
Take quick actions that change how the space feels: purge duplicates, move rarely used items to higher shelves, and keep countertops only for the tools you use every day. Small lifts like shelf risers, drawer dividers, and wall hooks multiply your space and save time when cooking.
Key Takeaways
- Zone the kitchen by purpose to speed up tasks.
- Reduce clutter and keep only what’s used regularly.
- Use vertical and inside-cabinet solutions to gain storage.
Assessing Your Kitchen Space

Determine what must fit, where clutter builds, and which surfaces serve cooking or storage. Measure cabinets, count drawers, and note how often each item gets used to guide choices.
Evaluating Storage Needs
They should list every item that lives in the kitchen for at least two weeks: cookware, dishes, food, small appliances, cleaning supplies, and extras like party gear. Group items by use — daily, weekly, seasonal — and mark the most-used items for easy access. This reveals if they need more deep drawers, pull-out pantry shelves, or a dedicated appliance cabinet.
Make a short inventory table to compare quantity with current capacity. Example:
- Daily plates: 6 — Cabinet A (fits)
- Pots & pans: 8 — Drawer B (crowded)
- Small appliances: 4 — Countertop (takes space)
Use this list to decide what must stay, what can go to another room, and what can be downsized.
Identifying Clutter Zones
They should walk the kitchen while cooking and note where mess forms most: countertops by the sink, the corner near the microwave, or the top of the fridge. Mark the hot spots on a simple sketch or photo. These zones usually need faster fixes like a tray for mail, a knife strip, or a wall rack for utensils.
Also track traffic flow during meals. Crowded entryways or a fridge that blocks a drawer show layout friction. Solving clutter zones often reduces time spent cleaning and keeps surfaces clear for prep and cooking.
Measuring and Planning Layout
They must measure cabinet widths, countertop depths, appliance clearances, and ceiling height. Record these numbers in inches or centimeters and keep the tape measure handy. Measure door swings and the space needed to open drawers fully.
With measurements, sketch a to-scale plan on grid paper or use a simple online planner like IKEA’s or the U.S. EPA’s guidance on kitchen layouts to test options. Prioritize reachable storage for daily items, vertical storage for baking sheets and lids, and pull-out organizers where depth causes buried items.
Decluttering and Streamlining
This section shows how to sort every item, remove extra duplicates, and get rid of things that do not belong in a small kitchen. It focuses on clear steps and simple rules to free up counter and cabinet space quickly.
Sorting and Categorizing Items
They should empty one cabinet or drawer at a time and lay items on a counter or table. Group like with like: plates, bowls, drinking glasses, mugs, baking pans, cooking pans, cutting boards, utensils, and food storage containers. Use sticky notes or small bins to label groups so they do not mix back together.
Put everyday items where they are easiest to reach, such as plates near the dishwasher and cooking pans near the stove. Store seasonal or rarely used items on high shelves or in a hallway closet. Make a small “maybe” box for items they are unsure about and set a 30-day reminder to revisit it.
Eliminating Duplicates
They should count how many of each item they actually use in a week. Keep only the number needed for normal routines—usually 4–6 plates and bowls, 2–4 everyday glasses, one or two mixing bowls. Extra matching items can take up valuable shelf space.
Use a simple test: if an item has not been used in six months, it likely can go. For single-use or specialty gadgets (corn peelers, avocado slicers), keep only one if it is used regularly. Place duplicates in a “donate” or “sell” box right away so they do not creep back into storage.
Donating and Disposing of Unused Items
They should sort the “donate,” “recycle,” and “trash” items into separate bags or boxes immediately. Clean and check small appliances and cookware; working items go to donation centers or a local resale shop. Broken pots, stained plastic, or items with mold should go to trash or proper recycling.
Label donation boxes with a drop-off date within two weeks to avoid keeping clutter. For food that’s expired, note the dates and compost or dispose of them. Record what was donated or tossed so they know what needs replacing later.
Maximizing Cabinet and Shelf Storage
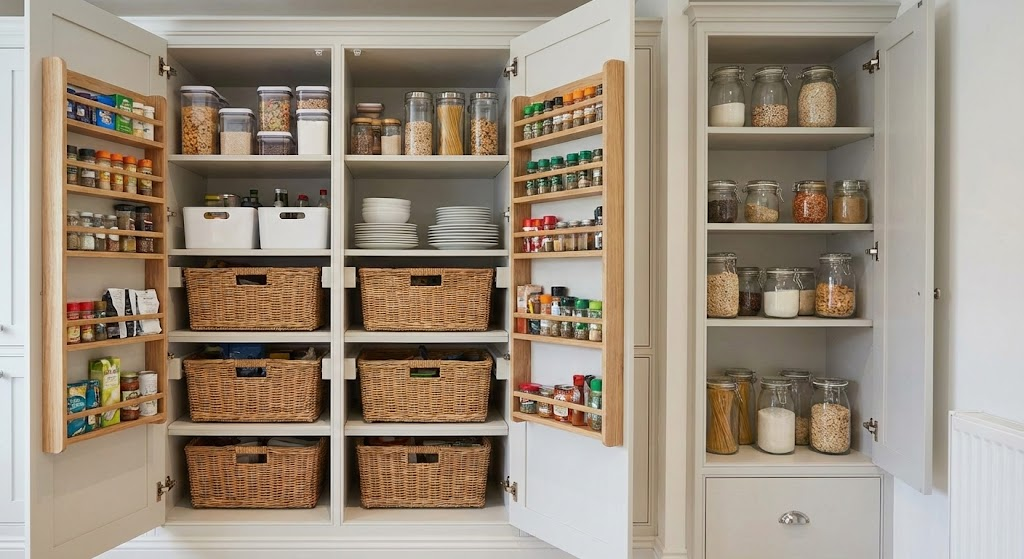
Cabinets and shelves should hold the things used most and make items easy to reach. Focus on using the full height of cabinets, bringing items forward on deep shelves, and making hidden spaces easy to access.
Utilizing Vertical Space
They should fit tall items and small tools without wasting height. Add tension rods or slim risers to stack baking sheets, cutting boards, and cooling racks vertically. Use adhesive hooks on the inside of cabinet doors for measuring cups, oven mitts, or small utensils.
Wall-mounted magnetic strips work well for knives and metal spice tins. For open shelves, group items by height and place frequently used dishes on lower rows. Consider clear, stackable bins for loose items; label each bin so they pull forward easily.
Use this quick guide to vertical solutions:
| Situation | Solution | Benefit |
|---|---|---|
| Tall bottles or baking pans | Vertical dividers or plate racks | Saves horizontal shelf space |
| Small loose items | Clear stackable bins | Easier access and visible inventory |
| Utensils and knives | Door hooks or magnetic strip | Frees drawer space, safer storage |
Installing Pull-Out Organizers
Pull-out organizers let items at the back become accessible. Install pull-out trays or drawers in lower cabinets for pots, pans, and small appliances. Full-extension slides ensure the tray comes all the way out so nothing hides behind other items.
Use tiered pull-out racks for spices or canned goods. Wire or laminate bottoms prevent spills and make cleaning easier. For corner cabinets, add a lazy Susan pull-out or swing-out shelves to use awkward angles without bending or digging. Measure cabinet depth and slide weight limits before buying.
Adding Adjustable Shelves
Adjustable shelves adapt to changing needs. Replace fixed shelves with ones that have multiple peg holes so shelf height can change for tall bottles, stacked bowls, or cereal boxes. Use shelf risers to create two usable layers on one shelf.
Mix solid and wire shelves: solid shelves work for small items that might fall through; wire shelves improve air flow and visibility. Keep a small set of extra shelf pegs and clips on hand for quick reconfiguration. Label shelf edges to remind users where items belong and maintain consistency.
Organizing Countertops and Small Appliances
Keep only the items used every day on the counter. Group appliances by task and give each group a dedicated spot near where it is used, so reaching for them feels natural.
Designating Appliance Zones
They should set up clear zones: coffee and breakfast, prep and chopping, and baking or mixing. Place the coffee maker, grinder, and mug rack together near the sink or breakfast nook to simplify morning routines.
Keep prep tools—blender, food processor, and cutting board—close to the main prep surface and near an outlet. This prevents dragging cords across the counter and keeps work space clear.
For rarely used appliances, store them in labeled cabinets or a pantry shelf at eye level. Use pull-out shelves or dual swing-out corner organizers so bulky items slide out easily and stay visible.
Add a small power strip inside a cabinet if possible to hide cords and charge small gadgets without clutter.
Minimizing Countertop Clutter
They should clear countertops by limiting visible appliances to two or three essentials. Store extras in upper cabinets, on a shelf above the fridge, or in a slim appliance garage that rolls up and closes.
Use vertical space: install a wall rail with hooks for utensils, a magnetic strip for knives, and a small shelf for spices or a toaster. This frees counter real estate while keeping items reachable.
Adopt a one-in, one-out rule for new appliances to avoid slow buildup. Place heavy or seldom-used items on lower shelves and lighter, daily-use items on open counters.
Label shelves and drawers so everyone in the household returns appliances to the right spot.
Creating Efficient Drawer Systems
Focus on grouping items by use and size, then fit them with the right organizers to stop shifting and wasted space. Aim for quick access to daily tools and clear separation for odd-shaped items.
Using Dividers and Inserts
They should match drawer depth and item sizes. Use adjustable dividers for forks, spatulas, and measuring spoons so each item has its own slot. Place dividers vertically for long utensils and horizontally for flat items like cutting boards.
Choose materials that resist moisture and glide smoothly, such as bamboo or plastic with non-slip padding. For small loose items, use stackable bins or removable trays so the contents can be lifted out for cleaning. Label each section with a small sticker or write-on tab to keep categories consistent.
Measure drawer width, depth, and height before buying inserts. Leave 1–2 inches of buffer at the front for handles and at the back for drawer slides to avoid pinching.
Storing Utensils Strategically
Put the most-used utensils in the drawer nearest the prep area or stove. Arrange items by frequency: daily tools front and center, occasional gadgets toward the back. Keep pairs together — tongs with spatulas, whisks with mixing spoons — to speed up cooking.
Use a shallow cutlery tray for forks, knives, and spoons to prevent nesting and make counts clear at a glance. For oversized tools, use a long single-compartment tray or a knife block insert to keep blades safe. Consider a shallow drawer dedicated to baking tools with elastic loops or clips to hold whisks and rolling pins steady.
Reserve one small section for safety items like oven mitts and a thermometer. That way they never get lost under loose gadgets.
Optimizing Pantry and Food Storage
Organize containers, group similar foods, and set a simple rotation plan. This makes items easy to find, keeps food fresh, and cuts down on waste.
Labeling Containers
They should use clear, readable labels on every container. Apply labels to the front and lid so items remain identifiable whether stacked or on a shelf. Use a consistent format: product name, purchase or open date, and a short use-by date when relevant.
Choose airtight, uniform containers for grains, pasta, flour, and cereal. Clear plastic or glass lets them see levels at a glance. Use dry-erase or removable label tags for frequently refilled staples so the label can change without replacing the container.
For bulk spices, use small jars with a master spice drawer or a magnetic rack on the fridge. Print or write labels in the same font and size to make scanning shelves faster. They should also label bins for snack types, baking supplies, and canned goods to speed up meal prep.
Grouping Similar Items
They should create zones by food type: baking, breakfast, snacks, canned goods, and cooking oils. Place the most-used zone at eye level. Reserve lower shelves for heavy items like bulk flour and top shelves for rarely used items.
Within each zone, arrange items by frequency and size. Put open packages or containers in front and unopened back. Use clear bins to corral small packets, like seasoning mixes or tea bags, so nothing falls behind larger containers.
Use vertical space with risers or tiered shelving for cans and bottles. Add a small cart or rolling shelf if floor space allows; it serves as an overflow zone for large sacks or paper goods. They should keep a small “grab-and-go” bin for lunch items near the prep area.
Implementing Rotation Systems
They should use a first-in, first-out (FIFO) method for all pantry items. When new groceries arrive, move older items forward and place new ones behind. This reduces expired food and keeps ingredients fresh.
For perishable dry goods, write the date opened on the label. Check expiration dates weekly during a quick pantry sweep and remove anything past its use-by date. Keep a small list on the door or a phone note of items nearing expiration to plan meals around them.
For bulk buys, divide large packages into smaller labeled containers before storing. That way, they use portions sooner and avoid repeated exposure to air. Schedule a monthly inventory check to reorder staples and discard stale items.
Maintaining an Organized Small Kitchen
Keep counters clear, put items back after use, and check supplies weekly to avoid overflow. Small, regular habits prevent big clutter and keep cooking fast and less stressful.
Establishing Cleaning Routines
They should pick two short daily tasks and one longer weekly task. Daily: wipe counters and stove after cooking, and load or empty the dishwasher each evening. These take 5–10 minutes and stop crumbs and spills from spreading.
Weekly tasks focus on the fridge, sink, and pantry. They should remove expired food, wash produce drawers, and wipe shelf edges. Spend 20–30 minutes on this once a week.
Use a simple checklist on the fridge to track tasks. Assign specific days (e.g., Tuesday: sweep and mop; Sunday: fridge check). Timed routines make consistency easier.
Periodic Reassessment
Every 3 months they should audit what they own and how they use it. Remove duplicates and donate or sell rarely used gadgets like extra blenders or specialty pans. This frees cabinet space and reduces decision fatigue.
They should also remeasure awkward spots and add targeted storage if needed. For example: a narrow pull-out shelf for baking sheets or a magnetic knife strip to free counter space. Install only items that solve a clear problem.
Track pantry and drawer use for a month before buying organizers. Let frequency of use drive placement: daily items at eye level, occasional items higher up.
FAQs
What are the first steps to organize a small kitchen?
They should clear clutter and sort items by use. Start with counters and one cabinet, then decide what to keep, donate, or store elsewhere.
How can vertical space help?
Shelves, wall racks, and hooks add storage without using floor space. Using the inside of cabinet doors for small items can free shelf space fast.
Which items should stay on the countertop?
Keep only daily-use items like a coffee maker or knife block. Store less-used appliances to keep counters clear and make cooking easier.
How can someone make drawers and cabinets work better?
Add drawer dividers, shelf risers, and clear bins to group similar items. Labeling helps everyone know where things belong.
Are there renter-friendly options?
Yes. Use freestanding shelving, tension rods, and adhesive hooks that remove cleanly. Portable carts or magnetic organizers also add flexible storage.
How often should the kitchen be rechecked?
A quick weekly tidy keeps things under control. A deeper edit every few months prevents clutter from building up.
What if space still feels tight?
Prioritize multi-use tools and stackable containers. Consider moving rarely used items to another room or offsite storage.
Is this expensive to do?
No. Many fixes cost little or nothing. Reorganizing, purging, and using simple organizers can make a big difference on a small budget.
Conclusion
A few small changes can make a big difference in a tiny kitchen. They help free counter space, cut clutter, and speed up tasks.
Start by removing items not used often. Then group tools by task so everything needed for cooking, baking, or cleaning stays together.
Use vertical space and slim organizers to gain storage without crowding the floor. Clear containers and labels keep supplies visible and easy to reach.
Maintain order with a simple routine. A quick nightly wipe and a five-minute tidy each week stops mess from building up.
They should pick multi-use items and flexible solutions that fit the kitchen’s layout. Renters can use non-permanent hooks and shelves to avoid damage.
Small investments in good organizers repay with less stress and faster meal prep. Consistency matters more than perfection.
Suggested checklist:
- Declutter first
- Assign zones for tasks
- Use vertical and under-shelf storage
- Label and group like items
- Keep a quick daily and weekly tidy
When these steps become habits, the kitchen stays useful and calm. It becomes easier to cook, clean, and enjoy the space.

