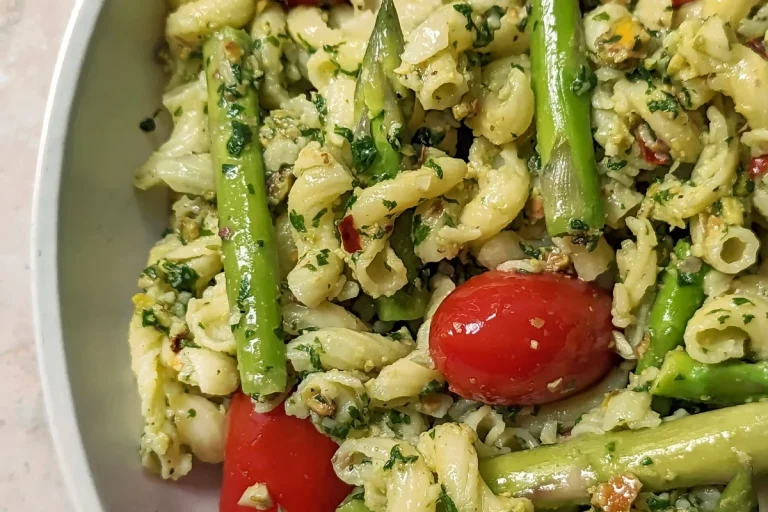
How to Cook Orzo in a Rice Cooker Easily and Perfectly
Yes, a rice cooker can make orzo evenly with very little stirring if you use enough liquid and check it early. It is an easy, low-stress method for weeknight sides, meal prep, and small kitchens.
If you want a simple side dish with less stovetop attention, orzo in a rice cooker is a practical option. In 2026, many home cooks are using rice cookers for pasta, grains, and one-pot sides because the method is easy, consistent, and friendly to small kitchens.
- Use enough liquid: Orzo needs a bit more room to absorb moisture than rice.
- Stir early: One quick stir helps prevent clumps and uneven texture.
- Watch the warm setting: Long holding times can dry out or make it gummy.
- Finish for flavor: Butter, olive oil, herbs, broth, or cheese improve the result fast.
Why Cook Orzo in a Rice Cooker? Search Intent, Benefits, and What Readers Want in 2026
People usually search this because they want a faster, lower-stress way to make a pasta side without watching a boiling pot. Orzo behaves a lot like small rice-shaped pasta, so a rice cooker can often handle it well with the right liquid ratio and a little timing awareness.
Quick answer: yes, a rice cooker can make orzo evenly with minimal stirring
Yes, a rice cooker can cook orzo evenly in many cases, especially if you use enough liquid and stir once or twice early on. The result is usually soft and separate, though exact texture will vary by cooker style and orzo brand.
Who this guide is for: busy home cooks, meal preppers, and small-kitchen users
This method is ideal if you want an easy side for weeknights, lunches, or batch cooking. It also helps when you do not want to tie up a stovetop burner or when your kitchen setup is compact.
Why a rice cooker beats stovetop babysitting for simple pasta sides
A rice cooker reduces the need to constantly check for boil-overs, stirring, and heat adjustment. That makes it especially useful for people who want a dependable side dish while they focus on the main meal or prep other ingredients.
What You Need Before You Start: Orzo Type, Rice Cooker Compatibility, and Ingredient Basics
Before cooking, it helps to know which orzo you have and how your rice cooker behaves. Some models shut off quickly, some run hotter than others, and some keep food warm for a long time, which can change the final texture.
Best orzo to use: standard, whole wheat, or gluten-free options
Standard semolina orzo is usually the easiest to cook evenly. Whole wheat orzo may need a little extra liquid and time, while gluten-free versions can be more delicate and may break down sooner, so watch them closely.
Rice cooker compatibility: basic cooker, fuzzy logic model, and multi-cooker settings
A basic rice cooker works well for this method if you monitor the first few minutes. Fuzzy logic and multi-cooker models may give you more control, but their auto-cycles can also vary, so use the manual or grain setting when possible.
Ingredient ratios, salt, oil, broth, and optional add-ins
For a simple version, use orzo, water or broth, and a small pinch of salt. A little olive oil or butter can help reduce sticking, and broth adds more flavor if you want the orzo to taste like a finished side rather than a plain base.
Start with a slightly higher liquid ratio than you would for stovetop pasta, then reduce it next time if your rice cooker runs hot or traps moisture well.
Step-by-Step Method for Cooking Orzo in a Rice Cooker Perfectly
The best results usually come from a simple process: measure carefully, stir early, and check texture before the cooker sits too long on warm. That keeps the orzo tender without turning mushy.
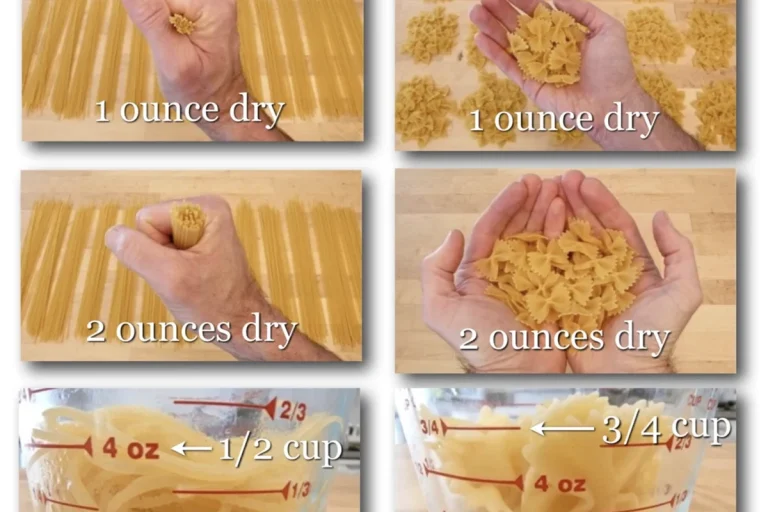
Measure the orzo and liquid correctly for soft, separate grains
Begin with a measured amount of orzo and enough liquid to fully cover it with some extra room for absorption. If you want a firmer result, use less liquid; if you want a softer side or a creamier finish, use more.
Place the orzo, liquid, salt, and any basic seasoning into the rice cooker pot. Stir once before starting so the pasta is evenly distributed.
Close the lid and begin cooking on the standard rice setting or a manual cook mode if your cooker has one. Stay nearby for the first few minutes so you can catch any foaming or sticking.
Open carefully and stir early if the orzo is clumping or if the liquid is bubbling unevenly. This helps the pasta cook more evenly and prevents a dense layer on the bottom.
Rinse or not rinse: when it helps and when it does not
Rinsing orzo is usually not necessary, and in many cases it removes surface starch that helps the sauce or broth cling later. If you want a looser, less starchy result, a quick rinse can help, but it is not required for most recipes.
Set the cooker, monitor the first few minutes, and stir if needed
Rice cookers can vary a lot in heat intensity, so the first few minutes matter. If you see the orzo sticking or the liquid foaming too much, pause and stir gently, then continue cooking.
How to know when the orzo is done and when to let it rest
Orzo is done when it is tender with a slight bite in the center or fully soft, depending on your preference. If a little liquid remains, let it rest with the lid closed for a few minutes so the pasta finishes absorbing moisture.
Fluffing, draining excess liquid, and finishing with butter or olive oil
Once the texture looks right, fluff the orzo gently with a spoon or rice paddle. If there is extra liquid, drain it carefully, then finish with butter, olive oil, or a small spoonful of broth for a smoother texture.
Timing, Water Ratios, and Cost Comparison: Rice Cooker vs Stovetop Orzo
Exact timing depends on the cooker and the amount of orzo, but the general pattern is predictable. In 2026, many households are choosing the rice cooker method because it saves attention more than it saves raw minutes.
Typical cook times in 2026 for different rice cooker styles
Basic rice cookers often finish orzo in roughly the same window as a small pasta batch on the stove, though the hands-off time feels easier. Fuzzy logic and multi-cookers may take longer to preheat or sense doneness, but they can also be more forgiving.
Recommended liquid-to-orzo ratios for al dente, tender, and creamy results
For a firmer result, use a lower ratio and check early. For tender or creamy orzo, use more liquid and allow a short resting period after cooking.
| Option | Best For | Watch Out For |
|---|---|---|
| Lower liquid ratio | Al dente side dishes | Can dry out if the cooker runs hot |
| Medium liquid ratio | Everyday tender orzo | May need a quick stir early on |
| Higher liquid ratio | Creamy or risotto-style results | Can turn soft if left on warm too long |
Cost and energy comparison: rice cooker convenience versus pan cooking
Rice cookers are often efficient for small batches because they heat a contained pot and shut off automatically. The biggest value is convenience: less stirring, fewer boil-over worries, and less time standing at the stove.
Flavor Ideas and Easy Variations for Orzo in a Rice Cooker
Plain orzo is useful, but the rice cooker method also works well for quick flavor upgrades. Broth, herbs, cheese, and vegetables can turn it into a side that feels more complete without adding much effort.
Broth-based orzo for savory sides
Using vegetable, chicken, or mushroom broth instead of water gives the orzo more depth right from the start. This is an easy way to make a simple side taste more finished without extra steps at the end.
Garlic, herbs, lemon, and Parmesan finish
Stir in garlic powder, dried herbs, lemon zest, or a small amount of Parmesan after cooking. These finishing ingredients work best at the end, when the orzo is hot and ready to absorb flavor.
Vegetable add-ins: peas, spinach, tomatoes, and mushrooms
Quick-cooking vegetables can be added near the end or stirred in after the cycle finishes. Frozen peas, baby spinach, diced tomatoes, and sautéed mushrooms all pair well with orzo and keep the dish flexible.
Creamy risotto-style orzo and one-pot meal ideas
If you want a creamier texture, use a bit more liquid and finish with butter, cheese, or a splash of cream. You can also turn the dish into a light one-pot meal by adding cooked protein or vegetables after the orzo is done.
Small changes in liquid and resting time make the biggest difference in texture.
Common Mistakes When Cooking Orzo in a Rice Cooker and How to Avoid Them
Most problems come from using too little liquid, ignoring the cooker during the early stage, or letting the pasta sit too long after it is done. These issues are easy to avoid once you know what to watch for.
Using too little liquid and ending up with undercooked pasta
Orzo can look nearly done before the center is fully tender, so underestimating liquid is a common mistake. If the pot looks dry too early, add a small splash of hot water or broth and continue cooking.
Overfilling the cooker and causing boil-over or uneven cooking
Too much orzo in a small rice cooker can lead to foaming, uneven heat, or overflow. If you are cooking for a crowd, split the batch instead of filling the pot beyond a comfortable level.
Skipping the stir and letting the orzo clump together
Orzo releases starch as it cooks, which can make it stick together if left untouched. One early stir is often enough to improve texture and help the pasta cook more evenly.
Leaving it on warm too long and drying out the texture
Keep-warm mode is useful for short holding periods, but it can dry out orzo or make it gummy if left too long. If the dish is finished, serve it soon or transfer it to a covered bowl.
Safety Notes, Cleanup Tips, and Rice Cooker Care After Cooking Orzo
Cooking pasta in a rice cooker is simple, but it can create more starch and foam than plain rice. A little care during cooking and cleaning helps protect the appliance and keeps future batches tasting better.
Preventing starchy overflow and protecting the inner pot
Use enough headroom in the pot so the liquid can bubble without spilling. If your cooker tends to foam, reduce the batch size next time and avoid very high heat settings unless the model is designed for them.
Safe handling of steam, hot lids, and automatic keep-warm modes
Open the lid carefully because steam can escape quickly. Keep hands and face away from the vent, and remember that the pot and lid can stay hot even after the cooking cycle ends.
Cleaning the pot, lid, and vent after pasta cooking
Wash the inner pot soon after use so starch does not harden on the surface. Wipe the lid, gasket, and vent area according to the manufacturer’s instructions, since pasta foam can leave residue in small openings.
If your rice cooker has a removable steam vent or inner lid part, let it cool fully before cleaning and reinstalling it.
Final Recap: The Easiest Way to Make Orzo in a Rice Cooker for Weeknight Sides
Orzo in a rice cooker is one of the easiest ways to make a fast side dish with very little active attention. The method works best when you use enough liquid, stir early, and stop the cooking before the texture goes too far.
Best practices to remember for consistent results
Start with a moderate liquid ratio, monitor the first few minutes, and let the orzo rest briefly before serving. Finish with butter, olive oil, herbs, or cheese for a better texture and more flavor.
When to use this method again and when stovetop cooking is better
This is a great method for weeknight meals, meal prep, and small kitchens. Stovetop cooking may still be better if you need very precise al dente texture, a larger batch, or a recipe that requires constant sauce reduction.
Frequently Asked Questions
Yes, you can cook orzo in a rice cooker with minimal sticking if you use enough liquid and stir early. A small amount of oil or butter can also help.
A medium liquid ratio is usually the safest starting point for tender orzo. Use a little less for firmer pasta and a little more for creamy results.
Rinsing is optional. Skip it if you want the starch to help the dish feel smoother, or rinse lightly if you want a looser texture.
Timing varies by rice cooker style and batch size, but it is often similar to a small stovetop pasta batch. Check early and let it rest briefly if needed.
Yes, broth and quick-cooking vegetables work well with orzo. Add delicate ingredients near the end or after cooking for the best texture.
Short keep-warm periods are usually fine, but long holding times can dry out or make the orzo gummy. Serve soon after cooking when possible.