Toast Browning Stages Explained for Perfectly Crispy Breakfast Every Time
Understanding the toast browning stages is key to achieving the perfect crispy breakfast slice every time. This guide breaks down each stage, from lightly toasted to deeply browned, so you can enjoy toast exactly how you like it.
Key Takeaways
- Toast browning stages: Range from barely toasted to very dark, each with distinct textures and flavors.
- Maillard reaction: The chemical process responsible for toast’s color and flavor development.
- Toaster settings: Adjusting browning levels helps control your preferred toast stage.
- Practical tips: Using the right bread type and toaster settings enhances browning results.
- Common issues: Uneven browning and burnt toast can be fixed with simple adjustments.
- Beyond bread: Toasting other items like English muffins or bagels requires different approaches.
- Experimentation: Understanding browning stages encourages you to find your perfect toast.
📑 Table of Contents
- Introduction: Why Understanding Toast Browning Stages Matters
- 1. What Causes Toast to Brown? The Science Behind the Process
- 2. The Toast Browning Stages Explained in Detail
- 3. How to Use Toaster Settings to Control Browning
- 4. Practical Tips for Perfect Toast Browning Every Time
- 5. Common Toasting Problems and How to Fix Them
- 6. Beyond Toast: Expanding Your Breakfast Horizons
- Conclusion: Master Your Toast Browning for Breakfast Bliss
Introduction: Why Understanding Toast Browning Stages Matters
Toast is a simple breakfast staple, yet getting it just right can be surprisingly tricky. Whether you prefer your toast lightly golden or deeply crisp, the way bread browns during toasting impacts not only texture but flavor too. Many of us hit the toaster button without thinking, hoping for perfect toast. But understanding the stages of toast browning can help you master your breakfast ritual and enjoy consistently delicious results.
In this article, we’ll walk you through the science behind toast browning, explain each stage in detail, and share practical tips for perfect toast every time. We’ll also touch on common issues like uneven browning or burnt slices and how to avoid them. Plus, if you like to toast more than just plain bread, we’ll cover tips for English muffins, bagels, and buns. By the end, you’ll be toast-savvy and ready to impress your taste buds.
1. What Causes Toast to Brown? The Science Behind the Process
The Maillard Reaction: Flavor and Color Magic
The key chemical process behind toast browning is called the Maillard reaction. This reaction happens when amino acids (from proteins) and reducing sugars (found in bread) interact under heat. It creates hundreds of new flavor compounds and the familiar golden-brown color we associate with toasted bread.
The Maillard reaction starts around 140°C (284°F) and accelerates as temperature increases. This is why bread left in a toaster for longer or at higher settings develops deeper browning but can also become bitter or burnt if overdone.
Caramelization vs Maillard Reaction
While caramelization also causes browning by heating sugars, it plays a minor role compared to the Maillard reaction in toast. Caramelization requires higher temperatures and mainly affects sugary foods. Toast’s browning owes much more to Maillard, which also creates a complex aroma and flavor.
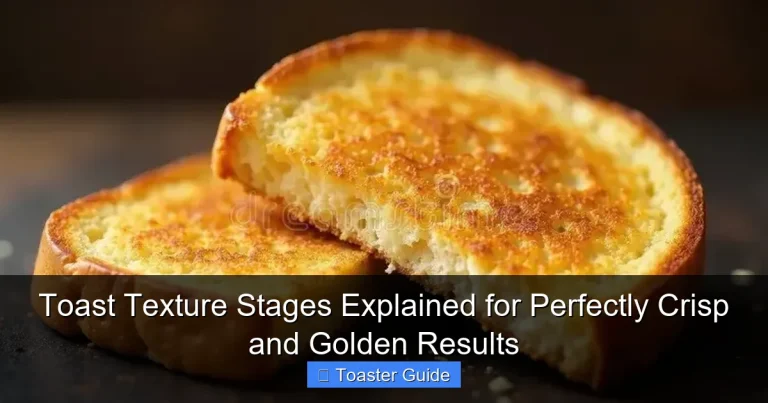
2. The Toast Browning Stages Explained in Detail
Stage 1: Barely Toasted (White to Light Golden)
At this stage, the bread is just warmed through with minimal color change. The crust remains soft, and the interior is tender. Flavor is close to fresh bread, with just a hint of warmth. This stage is ideal if you like very soft toast or want to lightly warm your bread for spreads like butter or jam.
Stage 2: Light Toast (Golden Brown)
The bread surface turns a light golden color with some crispness developing on the crust. The Maillard reaction has begun producing mild toasty flavors. The crumb inside remains soft but slightly firmer. This stage is perfect for those who want a gentle crunch without dryness, maintaining a balance of softness and texture.
Stage 3: Medium Toast (Medium Brown)
At medium toasting, the bread has a rich golden to medium brown color. The crust is noticeably crisp, and the crumb becomes firmer. Complex toasted flavors and aromas peak here, with slightly nutty and caramel notes. Many prefer this stage for a classic toast experience that holds up well to toppings like peanut butter or avocado.
Stage 4: Dark Toast (Deep Brown)
The bread surface is deep brown with a pronounced crunch and some dryness inside. The Maillard reaction has intensified, producing stronger, slightly bitter flavors. This stage suits fans of robust toast who like a crunch that contrasts with creamy spreads. However, it can become dry or crumbly if overdone.
Stage 5: Burnt Toast (Blackened)
Burnt toast occurs when browning goes too far, and the bread chars. This produces a bitter, unpleasant taste and hard texture. Nutritionally, burnt toast can contain unhealthy compounds, so it’s best avoided. If your toaster often burns toast, check out solutions in our guide on why toasters burn toast.
3. How to Use Toaster Settings to Control Browning
Understanding Toaster Browning Controls
Most toasters have a browning control dial or button that adjusts toasting time and heat intensity. Lower settings produce lighter toast, while higher settings create darker, crunchier slices. Because toaster models vary, you’ll need to experiment to find your sweet spot for each bread type.
Tips for Consistent Toasting
- Start with a medium setting and adjust up or down based on results.
- Use the same bread thickness and type for consistency.
- Clean your toaster regularly to avoid uneven heating or burnt crumbs.
- Toast a test slice first if trying a new bread or toaster.
Want to learn more about toaster basics and how to get the best toast? Check out our comprehensive toaster guide for beginners.
4. Practical Tips for Perfect Toast Browning Every Time
Choose the Right Bread
Different breads brown differently due to sugar and moisture content. White bread toasts quickly and evenly, while whole grain or rye breads may need more time. For an even browning experience, use bread slices of similar thickness.
Don’t Overload Your Toaster
Toasting multiple slices at once can reduce heat circulation, causing uneven browning. Avoid overcrowding and toast in batches if needed.
Use Fresh Bread for Best Results
Stale bread toasts differently and often absorbs more heat unevenly. Fresh bread provides better texture and flavor development.
Adjust Toasting for Different Bread Types and Items
Toasting isn’t just for sliced bread. For example, if you enjoy English muffins or bagels, they require different settings or methods to avoid burning or under-toasting. For detailed advice on toasting English muffins, see our ultimate guide to toasting English muffins in a toaster, and for bagels, check out our bagel toasting tips.
5. Common Toasting Problems and How to Fix Them
Uneven Browning
Uneven toast can happen due to dirty toaster elements, bread placement, or toaster design. Clean your toaster regularly and ensure bread slices are centered. If one side consistently browns more, consult our guide on why toasters burn one side for solutions.
Burnt Toast
Burnt toast results from too high a setting or leaving bread too long. Lower your toaster setting and monitor the process. Discard burnt slices promptly to avoid unpleasant flavors spreading.
Toast Too Soft or Not Crispy Enough
If your toast turns out too soft, increase the browning level or try a different bread with a denser crumb. Avoid covering toast immediately after toasting, as trapped steam softens crust.
6. Beyond Toast: Expanding Your Breakfast Horizons
Toasting English Muffins and Bagels
English muffins and bagels are thicker and denser than sliced bread. They often require a lower heat or longer toasting time to crisp the outside while warming the inside. Use toaster slots designed for these or consider toaster ovens. Our guides on toasting English muffins and toasting bagels have must-have tips.
Toasting Buns and Other Bread Types
Toasting buns or thicker bread slices requires attention to avoid burning while achieving a crisp crust. Adjust toaster settings accordingly and consider flipping halfway. Check our expert tips on toasting buns perfectly.
Conclusion: Master Your Toast Browning for Breakfast Bliss
Now that you understand the toast browning stages explained, you’re empowered to create toast that suits your exact taste. From barely toasted to deep brown, the Maillard reaction crafts the flavors and textures that make toast a breakfast favorite. Adjust your toaster settings, choose your bread wisely, and don’t be afraid to experiment. With these insights and practical tips, your morning toast will be perfectly crispy and delicious every time.
Remember, toast is more than just a quick slice of bread – it’s a chance to start your day with a little crispy joy. So, next time you pop bread in the toaster, think about the browning stage you want and go for it. Happy toasting!
Frequently Asked Questions
What causes bread to brown when toasted?
Browning happens mainly due to the Maillard reaction, a chemical process where proteins and sugars in the bread react under heat, creating color and flavors.
How can I control how dark my toast gets?
You can control toast darkness by adjusting your toaster’s browning settings and toasting time. Experiment with different levels to find your preferred stage.
Why does my toaster sometimes burn one side of the toast?
Uneven heating, dirty toaster elements, or misaligned bread placement can cause one side to burn. Cleaning and centering your bread often fixes this issue.
Can I toast items other than sliced bread in a toaster?
Yes, you can toast English muffins, bagels, and buns, but they may need different toaster settings or techniques due to their size and texture.
Is burnt toast harmful to eat?
Burnt toast contains bitter compounds and potentially harmful chemicals, so it’s best to avoid eating heavily charred slices.
How do I get crispy toast without it becoming too dry?
Toast at a medium browning level and use fresh bread for the best balance between crispness and moisture. Avoid over-toasting and let toast cool briefly before adding toppings.