How Do You Use an Electric Milk Frother for Perfect Foam

Use an electric milk frother by filling it below the line, choosing hot or cold froth, and stopping when the foam looks smooth. Clean it right after use so it keeps working well.
If you want café-style foam at home, an electric milk frother makes it easy. Add the right milk, stay within the fill line, choose a hot or cold setting, and stop when the foam looks smooth and glossy.
- Use the fill line: Too much milk causes spills and weak foam.
- Pick the right milk: Whole, skim, and oat milk all behave differently.
- Watch the texture: Stop when the foam looks smooth and glossy.
- Clean right away: Fresh milk residue is much easier to remove.
How Do You Use an Electric Milk Frother? The Quick Answer
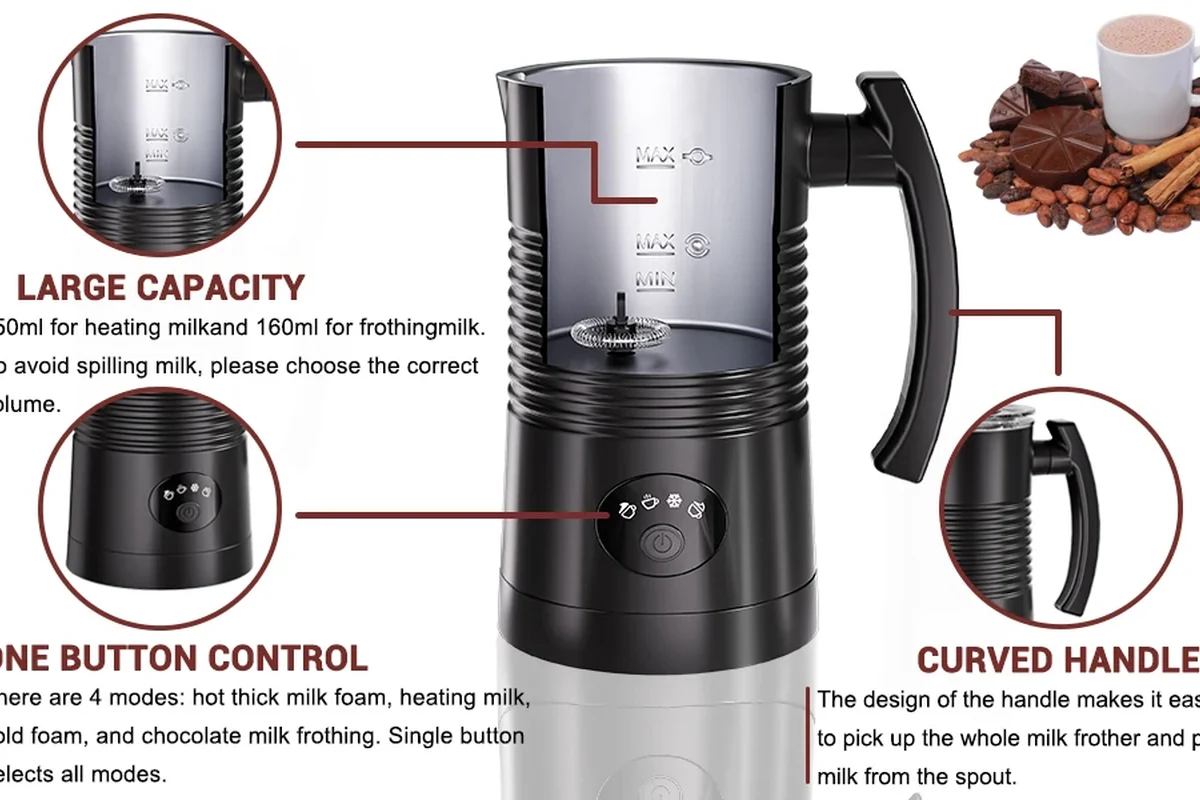
The basic process is simple. Pour in milk, pick the right setting, start the frother, and wait for the foam to build.
Most models work best when you avoid overfilling and follow the manual. That matters because frothers vary a lot in size, heat, and control style.
Use cold milk for stronger foam in many models. Heat it later if your frother does not warm milk on its own.
What an Electric Milk Frother Does and How It Works

An electric milk frother adds air to milk. Some models also heat it at the same time.
The result is a lighter texture that works well in lattes, cappuccinos, mochas, and iced drinks. The exact foam depends on the milk type, the frother design, and how long you run it.
Frothing wand vs. jug frother
A frothing wand is a small handheld tool. You move it through milk yourself.
A jug frother is a countertop unit with a cup or pitcher. It does more of the work for you and often heats the milk too.
Wands are simple and cheap to store. Jugs are easier for regular use and give more consistent foam.
The main difference is control. Wands are flexible, while jug frothers are easier and more repeatable.
Frothing Wand
Best for small jobs, travel, and quick cleanup.
VS
Jug Frother
Best for steady foam, hot milk, and hands-off use.
Heat, air, and milk texture
Foam forms when air mixes into milk proteins and fat. Heat changes the feel and stability of that foam.
Warm milk usually tastes smoother in coffee drinks. Cold foam can work better for iced coffee and some desserts.
Milk with more protein often foams well because protein helps trap air bubbles.
Step-by-Step Guide to Frothing Milk at Home
You do not need barista gear to get good foam. You just need the right milk, the right fill level, and a little patience.
Choose the right milk and fill level
Start with milk that matches your goal. Whole milk gives rich foam, while skim milk often makes lighter foam.
Plant-based milks can work too, but results vary by brand. Some foam well, and some stay thin.
Always check the fill line on the frother. Too much milk can spill, and too little may not froth well.
- Check the max fill line
- Use fresh milk for better foam
- Match the milk to the drink you want
Heat the milk or froth cold
If your frother heats milk, choose the hot setting for lattes and cappuccinos. Use the cold setting for iced drinks or cold foam toppings.
If your model only froths, warm the milk first if you want a hot drink. Be careful not to overheat it on the stove or in a microwave.
Hot milk can burn fast. Follow the manual and never fill past the safe line.
Froth until you reach the right foam
Turn the frother on and watch the texture. Stop when the foam looks smooth and has small bubbles.
For many drinks, you want foam that feels light but still pours well. If you keep going too long, the foam can turn dry and stiff.
The foam looks thin and watery.
Use colder milk, a smaller fill, or a longer froth cycle if the manual allows it.
Pour and use it in coffee drinks
Pour the milk slowly into your coffee. Hold back the foam with a spoon if you want to control the top layer.
For cappuccinos, add more foam. For lattes, pour more milk and less foam. For iced drinks, spoon the cold foam on top.
- Swirl the milk before pouring for a smoother texture.
- Tap the cup gently to pop a few large bubbles.
- Use a wide mug if you want easier pouring.
Best Milk Types, Settings, and Key Specs to Look For
The best frother for you depends on how you drink coffee. It also depends on how much space you have and how often you use it.
Whole milk, skim milk, and plant-based options
Whole milk usually makes creamy foam with a richer taste. Skim milk can make lighter, bigger foam.
Plant-based milk is more hit or miss. Oat milk often froths well, but results still depend on the brand and recipe.
Capacity, power, and speed settings
Capacity matters because frothers work best when you stay under the max line. Bigger is not always better if you only make one drink.
Speed settings can help with foam control on some models. A simple one-button frother may still be enough for most homes.
Hot froth, cold froth, and multi-use modes
Hot froth helps with classic espresso drinks. Cold froth works better for iced coffee and some desserts.
Multi-use models may also stir chocolate or heat milk without froth. That can be useful if you want one tool for more than coffee.
Best for lattes, cappuccinos, and warm drinks.
Great for iced coffee and chilled toppings.
Helpful if you want more than one milk texture.
Common Mistakes That Ruin Foam
Most bad foam comes from small mistakes. The good news is that they are easy to fix.
Overfilling the frother
Too much milk leaves no room for air. That can lead to spillovers and weak foam.
Always stay below the max fill mark. If you need more milk, froth in two batches.
Using the wrong milk temperature
Milk that is too warm can foam poorly. Milk that is too cold in some models may also slow the process.
Use the temperature your frother manual suggests. If your model does not heat milk, start with cold milk unless the maker says otherwise.
Frothing too long or too little
Too little time gives thin foam. Too much time can make foam dry or grainy.
Watch the texture, not just the clock. Stop when the milk looks silky and ready to pour.
- Follow the fill line
- Watch the foam texture closely
- Use the right setting for the drink
- Overfilling the cup
- Leaving the frother running too long
- Using damaged cords or lids
Safety Tips, Cleaning, and Maintenance
Electric frothers are simple, but they still need care. Heat, steam, and liquid make safety important.
Safe handling of hot milk and steam
Keep your hands clear of hot steam and hot metal parts. Let the frother cool before you move or clean it if the manual says to do so.
Never use a damaged cord, cracked jug, or loose lid. Stop using the appliance and replace it if the damage looks serious.
Follow the appliance manual and stop using damaged equipment.
How to clean the frother after each use
Clean it soon after use so milk does not dry on the parts. That makes cleanup much easier.
Many frothers need a quick rinse and a soft wipe. Some parts may be dishwasher safe, but only if the manual says so.
Unplug the unit, cool it if needed, then rinse or wipe the parts.
Check for milk buildup, worn seals, or loose parts.
Long-term care for better performance
Store the frother dry and clean. Moisture can leave odors or stains.
If foam quality drops over time, check for buildup, worn whisks, or a weak power connection. If the problem continues, review the manual or contact the maker.
Cleaning steps can vary by model. Always check which parts are safe to wash or soak.
Is an Electric Milk Frother Worth It in 2026?
For many home coffee fans, yes. It saves time, improves texture, and makes drinks feel more polished.
Still, the right choice depends on how often you use it and how much cleanup you want.
Who should buy one
An electric milk frother makes sense if you drink lattes, cappuccinos, or iced coffee often. It also helps if you want better foam without learning manual steaming.
It can be a smart pick for small kitchens too, since many models take little space.
Best for one or two drinks and tight counter space.
Best if more than one person wants frothed milk often.
Limits, value, and final recommendation
A frother will not replace a true espresso steam wand for every user. It also may not make the exact same texture as café equipment.
Even so, it gives strong value for the price of convenience in many homes. If you want easy foam with low effort, a good electric milk frother is worth it.
The best electric milk frother is the one that fits your drink style, milk choice, and cleanup tolerance. For most people, a simple jug frother with hot and cold settings is the safest, easiest all-around pick.
- Use the right milk and stay under the fill line.
- Pick hot or cold froth based on your drink.
- Stop when the foam looks smooth and glossy.
- Clean it right away for better results next time.
Frequently Asked Questions
Not always. Many frothers heat and froth at the same time, but some only froth. Check your manual and use the setting that matches your model.
Whole milk often makes rich, creamy foam. Skim milk can make lighter foam, and plant-based milk varies by brand and formula.
Overfilling is the most common cause. Stay below the max fill line and froth in smaller batches if needed.
Unplug it first, let it cool if needed, then rinse or wipe the removable parts. Only wash or soak parts that the manual says are safe.
It depends on the model and milk type. Stop when the foam looks smooth and glossy, not dry or stiff.
Stop using it if you see a damaged cord, cracked jug, loose parts, or unusual heat or smell. Check the manual and replace or service the unit as needed.