How to Use an Electric Milk Frother for Perfect Foam

Use the fill line, choose the right milk setting, and stop the cycle when the foam looks smooth. Clean the frother right away so it works better next time.
An electric milk frother is one of the easiest ways to make café-style foam at home. The basic method is simple: add milk, choose the right setting, start the cycle, and pour right away for the best texture.
- Start simple: Fill to the line and use the correct mode.
- Milk matters: Whole and oat milk often froth best.
- Watch the texture: Smooth, glossy foam beats dry, stiff foam.
- Clean fast: Fresh milk wipes off more easily than dried milk.
How to Use an Electric Milk Frother: The Fast Answer

If you want the short version, use cold or fresh milk, fill the frother only to the marked line, and choose the foam or heat-and-froth setting. Then let the machine finish its cycle and pour the milk soon after.
That’s the heart of it. The exact steps can vary by model, but the goal stays the same: make smooth foam without overheating the milk.
What an electric milk frother does
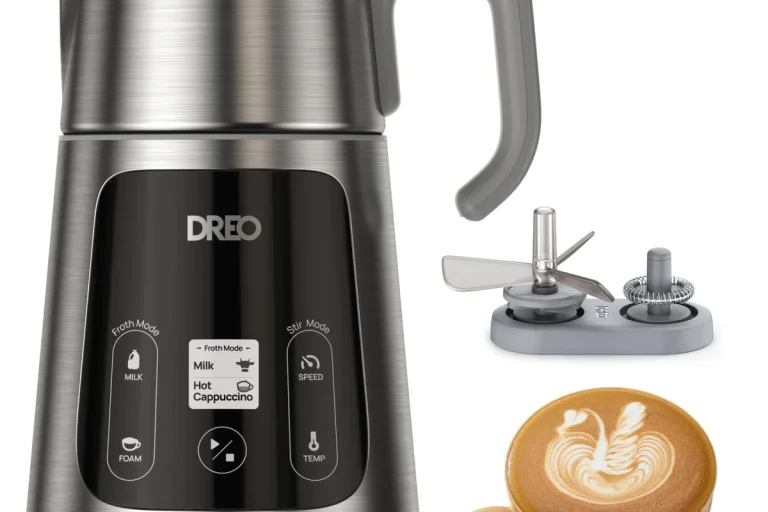
An electric milk frother whips milk with a small whisk or spinning disk. Some models only foam. Others also heat the milk at the same time.
That makes it useful for lattes, cappuccinos, hot cocoa, and even some cold drinks. In short, it helps you make a soft, creamy top layer with very little effort.
Features vary by model. Always check the manual for fill lines, cycle times, and approved milk types.
When to use it for best results
Use a frother when you want foam fast and with little cleanup. It works well for one or two drinks at a time.
It also helps when you do not want to steam milk on the stove or use a full espresso machine. For example, it can turn plain coffee into a richer drink in under a few minutes.
How an Electric Milk Frother Works

Most frothers work by adding air to milk while mixing it. Some also warm the milk to a drinkable temperature.
The result depends on the milk, the fill level, and the frother’s design. So, two people can use the same machine and still get different foam.
Frothing, heating, and whisking explained
Frothing means adding air to create foam. Whisking means moving the milk fast enough to blend air into it.
Heating changes how the milk feels and tastes. Warm milk often tastes smoother, but too much heat can make the foam thin or dry.
Milk proteins help trap air, which is why some milks foam better than others.
Types of electric milk frothers
There are a few common styles. Each one fits a different kitchen and drink habit.
- Handheld frothers are small and easy to store.
- Jug-style frothers heat and foam in one container.
- Standalone frothers often offer more control and larger capacity.
- Battery models are portable, but may feel less powerful.
In short, choose the style that matches your space and how often you make foam.
Step-by-Step Guide to Frothing Milk
Once you know your model, the process is straightforward. The main job is to avoid overfilling and to stop at the right time.
Choose the right milk and fill level
Start with the milk you plan to drink. Whole milk usually gives richer foam, while some plant milks need special barista blends.
Pour only to the marked line. If your frother has no clear line, leave room for the milk to expand.
Never overfill a frother. Foam expands fast and can spill onto hot parts or counters.
Set up the frother and start the cycle
Place the whisk, lid, or insert exactly as the manual shows. Then choose the setting for foam, heat, or cold froth.
Press start and let the machine run. Try not to open the lid during the cycle unless the manual says you can.
Fill to the line and keep the container clean and dry outside.
Pick foam, warm foam, or cold froth based on your drink.
Let the frother finish without lifting the lid or moving the unit.
Check foam texture and pour it well
When the cycle ends, look at the foam. Good foam should look smooth and glossy, not dry or stiff.
Pour the milk right away. If the drink has foam on top, tilt the cup a little and spoon the foam last.
Swirl the frother container gently before pouring. That can help mix the milk and foam for a smoother drink.
Best Milk, Settings, and Ingredients for Better Foam
The best foam comes from the right mix of milk, temperature, and simple ingredients. Small changes can make a big difference.
Whole milk vs. low-fat and plant-based milk
Whole milk often makes a fuller, creamier foam. Low-fat milk can make more bubbles, but the foam may feel lighter.
Plant-based milk varies a lot. Oat milk often froths well, while some almond or soy milks may need trial and error.
Temperature, sweetness, and flavor add-ins
Warm milk usually tastes best for coffee drinks. But very hot milk can lose sweetness and foam quality.
If you add sugar, cocoa, or syrup, use a small amount. Too much can weigh down the foam or make cleaning harder.
Some frothers work best with plain milk first. Add sweeteners after frothing if your model struggles with thick mixes.
Common Mistakes and How to Fix Them
Most frother problems come from a few simple mistakes. The good news is that many are easy to fix.
Why foam turns thin, dry, or too hot
Thin foam often means the milk was too warm, too cold, or not suited to frothing. Dry foam can happen when the cycle runs too long.
If the milk gets too hot, stop using that setting and check the manual. Some frothers heat faster than others.
The foam looks flat or disappears fast.
Use fresher milk, avoid overfilling, and stop the cycle as soon as it finishes.
How to avoid spills, splashes, and weak froth
Spills usually happen when the frother is overfilled or moved during operation. Weak froth can happen if the whisk is loose or the parts are not seated right.
Check the lid, whisk, and fill line before every use. If the machine seems off, stop and inspect it before the next cycle.
- Follow the fill line and use the right milk.
- Clean the whisk and cup after each use.
- Do not run the frother when parts look damaged.
- Do not force the lid or whisk into place.
Safety, Cleaning, and Maintenance Tips
Electric frothers are simple, but they still need care. Heat, steam, and moving parts can cause trouble if you rush.
Safe use around heat and moving parts
Keep hands away from the whisk while it runs. Also, do not touch hot metal or hot milk right after the cycle ends.
Set the frother on a dry, flat surface. Keep cords, plugs, and bases away from water unless the manual says they are washable.
Follow the appliance manual and stop using damaged equipment.
How to clean after each use
Clean the frother soon after use. Milk dries fast and gets harder to remove later.
If the jug or whisk is removable, wash it as the manual says. For non-removable parts, wipe the inside with a soft damp cloth after unplugging the unit.
Rinse or wipe parts before milk dries.
Check the whisk, seals, and lid for wear or buildup.
Long-term care for better performance
Store the frother dry and fully cooled. Keep the cord neat so it does not bend sharply.
If foam quality drops over time, check for buildup on the whisk or heating plate. If the unit smells burnt or behaves oddly, stop using it and review the manual.
Cost, Value, and What to Look for When Buying
If you are shopping for a frother, think about how you will use it. The best model is not always the fanciest one.
Key features that matter most
Look for easy controls, clear fill marks, and simple cleaning. A good lid and stable base also help.
For daily use, I’d focus on the parts you touch most. That usually means the cup, whisk, and control button.
- Capacity and footprint
- Foam and heat settings
- Removable or easy-clean parts
- Manual, warranty, and safety notes
What makes one frother worth more
Higher-value frothers often offer better build quality, more settings, or easier cleanup. Some also handle more than one drink style.
Still, a simple model may be the better buy if you only want foam for one cup at a time. The main trade-off is usually convenience versus control.
Final Recommendation: Is an Electric Milk Frother Worth It?
For most coffee lovers, yes, an electric milk frother is worth it. It saves time, adds texture, and makes home drinks feel more finished.
It is especially useful if you like lattes, cappuccinos, matcha, or hot cocoa. If you mostly drink plain coffee, you may not need one.
Who should buy one and who may not need one
Buy one if you want easy foam, fast cleanup, and a small appliance that does one job well. It’s also a smart pick for smaller kitchens.
You may not need one if you already own an espresso machine with a steam wand. You may also skip it if you rarely drink milk-based drinks.
Electric milk frother for everyday home drinks
The best choice is a model that matches your milk habits, cleanup needs, and counter space. Focus on simple controls, clear fill lines, and safe, easy care rather than extra features you may never use.
Best use cases for coffee, cocoa, and drinks
An electric frother works well for morning coffee, after-dinner cocoa, and iced drinks that need a creamy top. It can also help you make a nicer drink when guests stop by.
In short, it is a small tool with a big payoff. If you use it the right way, it can make everyday drinks feel a lot more special.
- Use the right milk and never overfill the cup.
- Stop the cycle when the foam looks smooth and glossy.
- Clean the frother right away for better results next time.
Frequently Asked Questions
Use the fill line marked by the maker whenever possible. If there is no line, leave enough room for the milk to expand during frothing.
Thin foam often comes from the wrong milk, overfilling, or running the cycle too long. Try fresher milk, a smaller fill level, and the setting your manual recommends.
Yes, but results vary by brand and type. Oat milk often works well, while some almond or soy milks may need trial and error.
Unplug the unit first and follow the manual. Wash removable parts as directed, and wipe non-removable parts with a soft damp cloth after each use.
Stop using it right away and check the manual. Do not keep running damaged equipment, and contact the maker or retailer for help.
It is worth it if you make milk-based drinks often and want quick foam with little effort. If you mostly drink plain coffee, you may not need one.